


Introduction
More homeowners are turning to solar energy in 2025 than ever before. Rising energy costs, federal tax credits, and improved solar technology have made installing solar panels one of the smartest home upgrades today. But how exactly does the installation process work — and what should you expect along the way?
In this detailed step-by-step guide, we’ll walk you through every phase of going solar — from initial consultation to flipping the switch on your new system. Whether you’re just researching or ready to install, this article will help you understand what happens, how long it takes, and how to make the most of your investment.
Step 1 — Evaluate Your Home’s Solar Potential
Assessing sunlight exposure
The first step is determining if your home is a good candidate for solar. Installers use solar mapping tools and satellite imagery to analyze how much sunlight your roof receives year-round.
Factors that influence performance:
Roof orientation (south-facing roofs perform best in the U.S.)
Roof pitch and shading (from trees, chimneys, or nearby buildings)
Roof size and available space for panels
Roof condition and structure
Before installation, check if your roof is in good shape. If it’s nearing the end of its lifespan or shows signs of damage, replacing it before installing panels can save future costs.
Tip: A new roof paired with solar often qualifies for combined warranties and long-term protection.
Step 2 — Choose a Trusted Solar Installer
Research local companies
Look for licensed, insured, and experienced contractors in your area. Reputable solar companies should:
Offer free consultations and system designs
Provide clear warranties for panels and workmanship
Handle permits and interconnection paperwork
Compare multiple quotes
Always get at least three quotes. Compare:
Price per watt
Panel and inverter brands
Warranty coverage
Estimated production and savings
Why working with NationPro USA makes a difference
At NationPro USA, we use satellite measurement tools to create precise solar designs without pushy in-home visits. Our certified local partners ensure professional installation backed by nationwide warranties and transparent pricing.

Step 3 — System Design and Energy Analysis
Custom system sizing
Once you’ve chosen an installer, a design team will evaluate your electricity bills to determine how much power you use annually. The goal is to size a system that offsets most (or all) of your energy consumption.
| Average U.S. Home | Typical Range |
|---|---|
| Monthly usage | 800–1,200 kWh |
| Recommended system size | 6 kW–10 kW |
| Roof space needed | 350–600 sq ft |
Panel layout and design tools
Designers create digital renderings showing exactly where panels will go, how they’ll look, and what energy they’ll generate. You’ll receive a proposal with expected production, costs, incentives, and payback period.
Step 4 — Handle Permits and Approvals
Permitting process
Solar installation requires building and electrical permits from your city or county. Your installer usually handles all of this, including:
Local permit applications
Engineering approvals (roof load, electrical design)
Utility interconnection requests
HOA and zoning considerations
If you live in a homeowners’ association (HOA) or a historic district, you may need additional approvals. Most HOAs can’t legally prevent solar installation, but design restrictions may apply.
Pro tip: Working with a company familiar with local building codes (like NationPro USA’s partner network) speeds up approvals and prevents costly delays.
Step 5 — Installation Day
Preparing the site
Before installation, technicians inspect your roof and attic again to confirm everything matches the design. Then they mark mounting locations and safety lines.
Mounting and wiring the system
Here’s what happens during installation:
Install racking and mounts – The foundation that secures solar panels to your roof.
Attach panels – Panels are bolted onto the racking system securely.
Wire the system – Electricians connect panels to inverters and your home’s main electrical panel.
Add monitoring devices – Smart meters or apps let you track real-time energy production.
Typical installation timeline
1–2 days for small to medium systems
3–5 days for larger or more complex roofs
Installers keep the workspace tidy, protect shingles, and ensure all connections are weather-sealed.
Step 6 — System Inspection and Utility Connection
Local inspection
After installation, your city or county inspector verifies that the system meets electrical and safety codes. They’ll check wiring, grounding, and equipment labels.
Utility approval (interconnection)
Once you pass inspection, your utility company reviews the system design and approves grid connection. After approval, you’ll receive Permission to Operate (PTO) — your official green light to turn on your solar system.
This final step may take a few days to several weeks depending on local utility workload.
Step 7 — Activation and Monitoring
Turning on your system
After receiving PTO, your installer will guide you through activating the inverter and connecting your monitoring app. Within minutes, you’ll see your panels producing clean power.
Track your production
Most systems come with an online dashboard that displays:
Daily and monthly energy generation
Lifetime production
Carbon offset statistics
Keeping an eye on production ensures your panels perform at peak efficiency.
Maintenance and care
Solar panels are low-maintenance, but periodic cleaning helps efficiency. Inspect once or twice a year for:
Dust or pollen buildup
Leaves or snow obstruction
Loose wiring or bird nests
NationPro USA offers maintenance plans and remote monitoring support to keep your system running flawlessly.
Step 8 — Start Saving and Reap the Benefits
Lower energy bills immediately
From the first month, you’ll notice smaller utility bills. Most homeowners see 50–100% reductions in energy costs depending on system size and usage.
Federal and state incentives
As of 2025, homeowners can claim the 30% federal solar investment tax credit (ITC) on total system costs. Many states also offer rebates, sales tax exemptions, or performance-based incentives.
Increase in home value
Studies show solar installations can increase property value by 4–6%, with homes selling faster and at higher prices.
Environmental benefits
Each average home solar system offsets about 100,000 lbs of CO₂ over its lifetime — equivalent to planting over 1,000 trees.
Frequently Asked Questions
How long does the entire process take?
From your first consultation to activation, the full process typically takes 4–8 weeks, depending on permits and utility approvals.
Do solar panels work during cloudy days?
Yes, panels still generate electricity on cloudy days — just at reduced output (around 10–25%).
How long do solar panels last?
Modern panels have a lifespan of 25–30 years, with warranties guaranteeing at least 80% production by year 25.
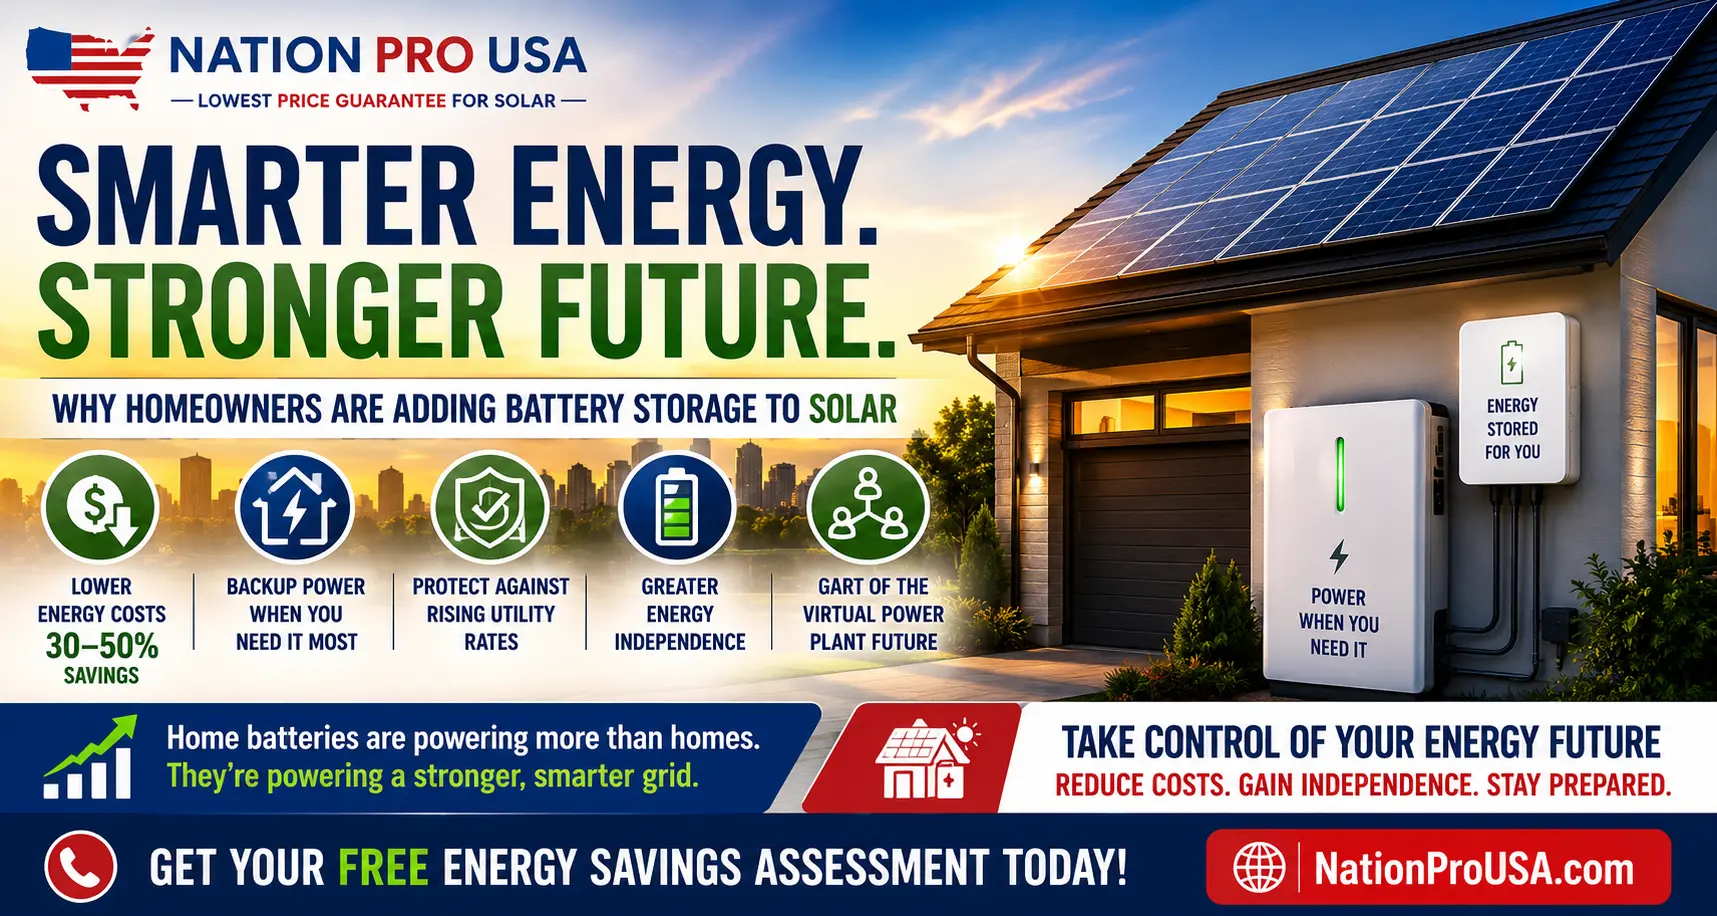
Can I add battery storage later?
Absolutely. Most systems are battery-ready, allowing you to add storage later for backup power or energy independence.
Why Homeowners Choose NationPro USA
At NationPro USA, we simplify the solar journey. Our process is powered by technology, not salespeople. We use satellite data to design accurate, instant quotes — no in-home visits required.
We partner with certified local installers and top-tier solar brands to deliver long-lasting systems backed by warranties and nationwide support. With us, going solar is transparent, efficient, and affordable.
Conclusion
Installing solar panels may seem complex, but the right team makes it simple. From assessing your roof to flipping the switch, each step ensures your system delivers clean, reliable power for decades.
By understanding the process, you can ask the right questions, set realistic expectations, and enjoy energy independence sooner.
If you’re ready to make 2025 the year you go solar, reach out to NationPro USA — where smarter home upgrades start with clean energy.